Creating Targets
In this section, you will get to know how to create targets in the following ways:
- Manually create a target
- Uploading .csv file to create target
Creating a Target
In this section, you will get to know how to manually create a target in the platform.
To create a target, do the following:
-
Login to the platform.
-
Click the Data module, and then click the Target Manager sub-module.
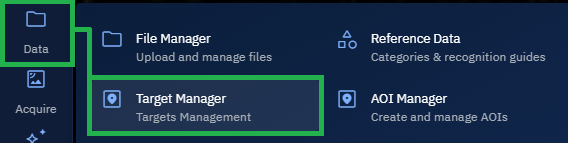
The Target Manager page is displayed.
-
In the Target Manager page, under the Target Manager panel, click the + icon and then click the Create New Target option to start the process of creating a target.
The Create New Target panel is displayed.
-
In the Create New Target panel, do the following:
i. Type a target id in the Target ID field. Alphanumeric characters are acceptable.
ii. Type target name in the Target Name (Arabic)
iii. Type a target name in the Target Name (English). Alphanumeric characters are acceptable.
iv. Type a description of the target in the Description field.
v. Copy-Paste a target geo-location coordinates in the Target Location field and then select one of the following common coordinate systems/formats:
- Military Grid Reference System (MGRS)
- Decimal Degrees (DD)
- Degrees, Minutes, Seconds (DMS)
- Universal Transverse Mercator (UTM)
vi. Select a color of the target location.
vii. Draw a Polygon or Rectangle, Select an AOI from the AOI Library, or simply Copy-paste WKT coordinates in the Area of Interest section. This is an optional step to draw an area of location.
-
Click the Save button to create a target.
Uploading a Target
In this section, you will get to know how create targets in bulk by uploading a .csv with the relevant columns.
To create targets in bulk involves the following:
- Creating a .csv file that contains the relevant columns
- Upload the .csv file to create a target
Creating a .csv file
In this section, you will get to know how to create a .csv file and upload it in the later steps to create a target.
To create a .csv file, do the following
-
Open the spreadsheet application on your computer. For example, Microsoft Excel.
-
Click the Blank Workbook icon to create a new workbook and then create the following columns:
| Column Header | Column Description | Example |
|---|---|---|
| ID | Unique identifier for the target record | 001 |
| TGT_CODE | Short alphanumeric code for the target | TGT_AIRFIELD_23 |
| TGT_Name | Descriptive name of the target | Al Asad Airfield |
| LAT | Latitude in decimal degrees (DD) or other format | 33.7866 |
| LONG | Longitude in decimal degrees (DD) or other format | 43.1210 |
| COMMENTS | Additional notes or description about the target | Primary military airbase in region |
- Save the workbook as a .csv file.
Creating a target by uploading a .csv file
In this section, you will get to know how to use the .csv (with the relevant columns) and then use it to create a target.
To create a target by uploading a .csv file, do the following:
-
Login to the platform.
-
Click the Data module, and then click the Target Manager sub-module.
The Target Manager page is displayed.
-
In the Target Manager page, under the Target Manager panel, click the + icon and then click the Upload Target option to start the process of creating a target by uploading a .csv file.
A dialog box is displayed to select the .csv file.
-
Select the .csv file and click the Open button.
The Import Targets dialog box is displayed confirming successful importing.
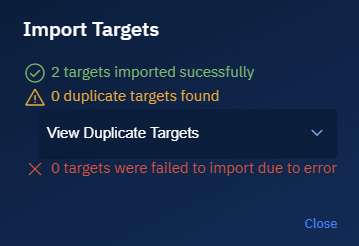
- In the Target Manager panel, view the targets that are successfully imported and then click the Eye icon of each target to visualize them on the map.